ChartMystic
  • How it works
  • Products
  • Live demo
  • Results
  • Pricing
  • Docs
Log inSign up
  • How it works
  • Products
  • Live demo
  • Results
  • Pricing
  • Docs
  • Log in

Documentation

Artemis Pro

InstallationOverviewHow Artemis Pro ThinksReading The ChartTrend EngineSignal ReferenceLiquidity LinesLiquidity GrabsSession BoxesHTF LevelsHTF CandlesHTF Info TableBacktesting And Data WindowSupported Markets And ChartsSettings ReferenceFAQGlossary

Scribe Studio

OverviewAsk for a StrategyPerformanceTrade AnalysisCodeTweaking Your StrategyTransfer to TradingViewThe Strategy LibraryHistory & Saved StrategiesFAQGlossary
ChartMystic
Documentation/Artemis Pro/Liquidity Grabs

Liquidity Grabs

The sweep-and-fail event Artemis Pro is built around: how grabs are tracked, and how a trigger pattern inside the grab window confirms a setup.

A liquidity grab is the moment Artemis Pro is built around: price sweeps a drawn level, takes the stops resting behind it, and closes back on the original side. This page explains the event, how the indicator tracks it, and exactly what it does and does not do about it.

The Event

Behind every marked swing high sit the stops of short sellers; behind every swing low, the stops of longs. When price pushes through such a level, those stops fire. If the push had real intent, price keeps going. But very often the move dies right there: the stops were the target, the fuel is now spent, and the traders who chased the break are trapped on the wrong side.

The chart fingerprint is unmistakable once you know it: a candle whose wick trades through the level while its body closes back on the original side. The wick is the grab. What follows is frequently a sharp move in the opposite direction, powered by the trapped traders exiting.
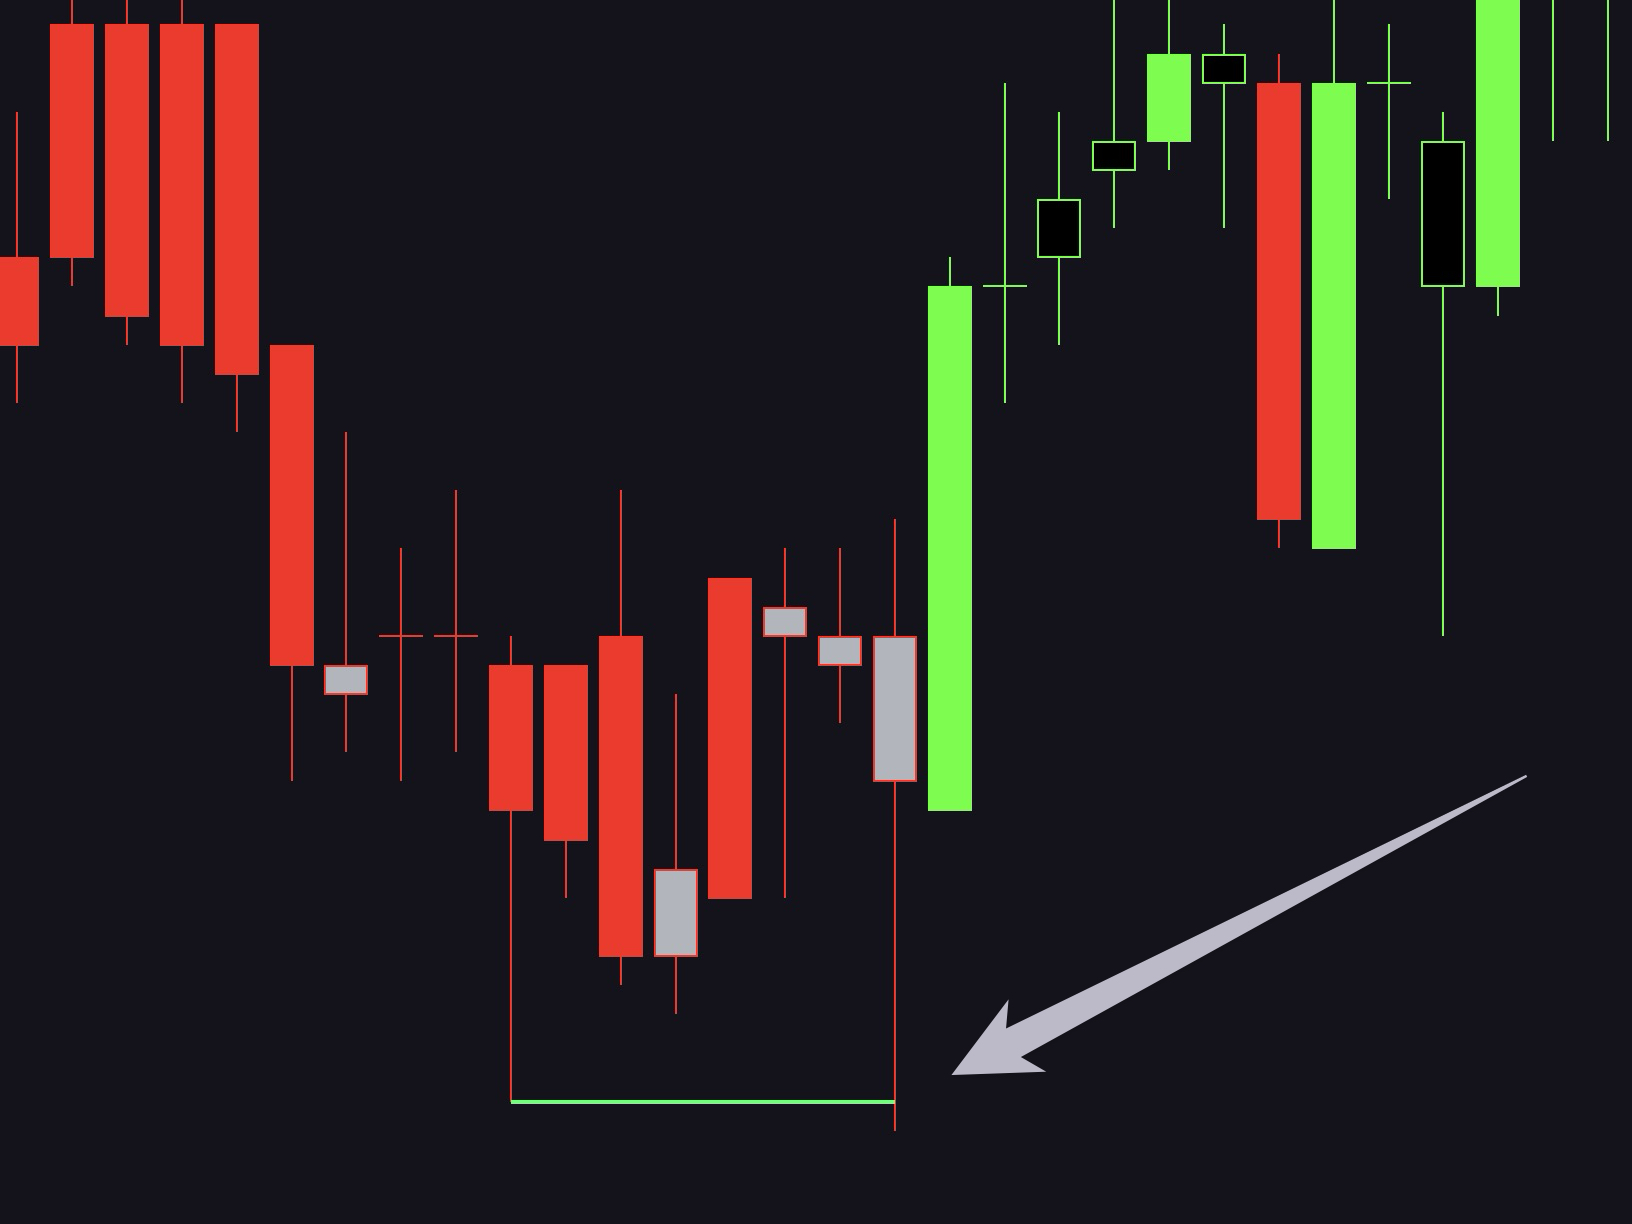
Bullish liquidity grab at support
Screenshot
Bullish liquidity grab where a long lower wick sweeps below a green support line and price immediately expands higher — the arrow marks the rejection wick; the following neon-green candle illustrates the setup, not a guaranteed outcome

How Artemis Pro Tracks It

The grab logic runs on the Liquidity Lines module. When price touches a line (mitigation), Artemis Pro checks how the touch closed:

  • Bullish grab (sweep of support): the candle trades below a support line but closes back above it.
  • Bearish grab (sweep of resistance): the candle trades above a resistance line but closes back below it.

Either outcome records the grab and opens a short grab window. Clean breaks are timestamped too, and a candle that snaps back through a just-broken level within the next couple of bars also registers as a grab, because that is the same trap in slow motion. A grab is cancelled if price later closes back through the swept level in the breakout direction, since at that point the break was real after all.

What You See: Confirmed Setups And Label Prominence

The grab window changes two things on your chart.

The label grows. When a reversal pattern from the Signal Reference completes within 3 bars of a grab or level break, or on a bar that is itself a confirmed setup, its label prints large instead of small. A pattern firing in open space gets a tiny label; the same pattern firing right where liquidity was just taken gets a prominent one. Size is a read on the pattern happened, not a verdict that every condition of a trade is met.

PreviousLiquidity LinesNextSession Boxes

Need help?

where

The setup is confirmed. A grab opens a window of the grab bar plus the four bars that follow it: a grab registered on bar 100 can confirm a setup on bars 100, 101, 102, 103 and 104, and no longer on 105, unless a newer grab or a reset has replaced it by then. If one of the trigger patterns completes inside that window — MS, bullish TLS, bullish HK, 3WS, PL, TOU, or BnR for a Setup Long; ES, bearish TLS, bearish HK, 3BC, or TOD for a Setup Short — Artemis Pro confirms a Setup Long or Setup Short: the label prints large and the state appears in the data window. A fast rejection counts too — a trigger pattern within two bars of a tagged level, closing back on the reversal side of it, confirms the same setup. One filter sits on top: while unmitigated liquidity is still resting above (for shorts) or below (for longs), the setup is suppressed, because a trade that runs straight into untouched stops is the trade the method skips. The check is made against the active liquidity lines on your chart — an untouched low line below the current bar's low blocks a Setup Long, an untouched high line above the current bar's high blocks a Setup Short. It looks at lines, not at the distance to a target and not at actual resting orders.

That combination is the indicator telling you: this pattern did not appear in a vacuum. It completed at the exact spot where trapped traders are now fuel for the other direction, which is the confluence the trading method is built on.

Decision support, not autopilot

A confirmed setup is the highest-confluence condition the script can print, not an instruction to enter. Whether it is a trade — given the trend, the session, the level's importance, and the news calendar — is your read to make.

Timing

Two mechanical facts to keep in mind when reviewing grabs:

  • Patterns evaluate on bar close and do not repaint intrabar, so the large label appears when the signal candle closes, not while it is still forming.
  • Swing lines appear 3 bars after their pivot (confirmation lag). Until a pivot is confirmed it is not a level yet, so a sweep of a brand-new, not-yet-confirmed extreme will not register. Once a line is on the chart it is live at once — there is no further waiting period after it appears.

Trading The Moment

The grab is step two of a four-step setup: level, grab, pattern, entry. Artemis Pro marks the first three and confirms the confluence; combining them with daily bias, session context, and your own risk rules is the part that stays with you.